Scroll through the lesson and click on notation/video/audio links to load the interactive players.
Please subscribe to get full access to all lessons for only $7.95/month PLUS 1 week free trial.

Riff Interactive lessons are
LESS expensive and
MORE interactive than alternatives!
More Info
|
|

Beginning
Guitar I - Lesson 3
Strumming and Picking 1-Finger
Chords
Lyle: In Lesson 1 you
learned about tuning your guitar and strings. Lesson 2 you
learned how to read TAB. In this lesson you'll learn the basics of
strumming and picking a chord to a beat! Let's get started by checking your tuning.
Playback this TAB file and make sure your guitar is in tune with
me:
check your
tuning
Lyle:
Next you're going to learn a simple one-finger chord. It's called the G chord
and only uses 3 strings and one finger. Use your 3rd finger on the 3rd fret of
the 1st string:
G
chord
G chord
G
chord
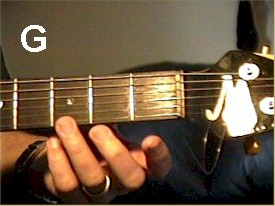
Lyle: Notice my finger placement, it's right
behind the 3rd fret wire.
Lyle: Now try playing this chord. Strike the
three strings at the same time by swiftly strumming them in a downward
stroke. Here's a video example. Watch this and
strum just like I am:
basic strum pattern
Lyle:
There are many ways to play a G chord, and I hope you'll learn all of them
later, but this is the first chord I remember learning.
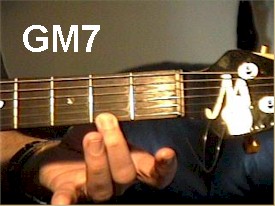
Lyle: The next chord I learned was the G major7,
or GM7. It uses the 2nd finger on the 2nd fret of the same 1st
string:
GM7
chord
GM7 chord
GM7
chord
Lyle: There are many types of chords and they can
have strange sounding names to them. You'll learn the music theory behind
everything at a later time. I think you should just learn to play now, memorize
the names of what you're playing, then learn the theory part at a later
time.
Lyle: Another G type of chord is the G7 chord. It
has a blues sound to it:
G7 chord
G7 chord
G7
chord
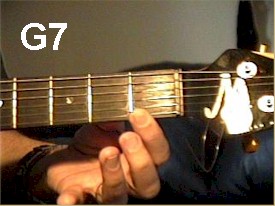
Lyle: Notice your 1st finger is used on the 1st
fret, and it's tucked right behind the first fret.
Lyle: Now you've learned 3 basic one finger
chords. They all use just 3 strings. Make sure you're using the correct fingers
for each chord. This way you'll look just like a pro
playing!
Lyle: The G chord uses the 3rd/ring finger, the
GM7 uses the 2nd/middle finger, and the G7 uses the 1st/index finger. This is
very important.
francric: What is the significance of M7 and 7?
Lyle:
Those are the names of different sounding chords. Chords will have many
different names to them. I'll cover music theory in later
lessons.
Lyle: Now you'll take those three chords and
learn to play them with a band! Look at this chord chart, it will display the
chord progression you will learn next.
chord chart
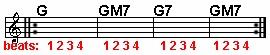
Lyle: Notice there are 4 groups of 4 beats, and a
chord name at the beginning of each group. These groups of beats are divided
into measures. There are 4 measures in the chord chart.
Lyle: If you strum once, on beat 1, and switch to
the next chord according to the chord chart, you'll get
this:
rhythm riff
1
rhythm riff
1
Lyle:
Be sure to listen to the TAB so you can hear my guitar playing with the band, or
watch the video clip.
Lyle: Try it with the band! Here's a looping jam
track of the drums and bass guitar holding down the beat for
you:
Jam Track in
G
francric: That
jam track really makes a difference!!!!!
Lyle: Yes, and it's important to try to play
right along with it to help your timing. Learn to listen to both you and the jam
track at the same time. Keep counting to 4. Each beat is a count, so go: 1, 2,
3, 4, 1, 2, 3, 4..... Start by strumming the G chord on beat 1, then count all
the way to 4, then switch to the GM7 chord on the next beat 1 and keep
counting.....
Support: You can also slow down the jam track
without changing the pitch, using the "tempo" button.
Lyle: Try to copy what I'm doing in the video and
you'll be playing exactly what I'm showing you here!
Lyle: Rhythm riff 1 has you strumming once, on
beat 1 of each measure, then you switch chords for the next measure and so
on...
Lyle: The next rhythm riff is double that of
rhythm riff 1. You'll strum down on beats 1 and 3, so twice for each
chord:
rhythm riff
2
rhythm riff
2
Support: That works with both the tab notation
and the jam tracks, slowing the tempo
down.
Lyle: The little v marks at the top of each
tabbed out chord is a reminder to strum
down. If you strum down for each beat, it would
look and sound like this:
rhythm riff 3
rhythm riff
3
Lyle:
So you see you've been adding strums in each measure, making it sound like
you're playing faster, but the tempo of the jam has stayed the
same.
Lyle: Try to play right along with the jam track
to help your timing. Learn to listen to both you and the jam track at the same
time.
Joel:
Speaking as a drummer, it helps to also keep count in your head.. it's a little
hard at first but it helps keep the beat. :)
Lyle: That's right Joel,
always try to keep counting to 4. Tap your foot to each of the 4 beats while you
count!
Lyle: Next is the tricky rhythm pattern because
it uses up strokes. It will also sound like you're playing a faster song but
it's still at the same speed, only you are going faster. Try
this:
rhythm riff
4
rhythm riff
4
Lyle:
Gently brush the strings with your pick, and slightly change the angle as you
gown down and up. Here's a video of this technique:
strumming hand close-up
Lyle:
Now try picking each note of the chord like this:
picking
pattern 1
picking pattern
1
Lyle:
Notice you're simply playing during the first three beats of the measure. Now
try this variation where you fill in that fourth beat of the measure by coming
back to the second string:
picking pattern 2
picking pattern
2
Lyle:
Next is a "double time" variation of the last picking pattern. Make sure you're
moving your pick in the right direction:
picking pattern 3
picking pattern
3
Lyle:
When you are picking notes and not strumming, it's sometimes easier to anchor
your picking wrist down to the guitar to help with your picking accuracy. Bridge
your picking hand to the guitar by placing your 3rd and or 4th fingers down like
this:
picking hand
position
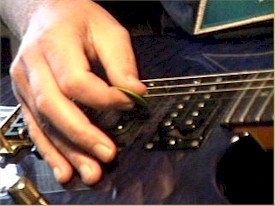
Lyle: Here's a video that might help you see this
clearer:
picking
hand close-up
Lyle: Sorry to keep you all
late after class, let's take a break. Any quick questions before I have to
go?
Steve-o:
What kind of pick is it that you use?
Lyle: I use a green Dunlop Tortex .88 pick. It's
almost a heavy gauge pick with a very slight give to it. I suggest using a
medium or heavy pick for a beginner. The light gauge picks are too thin and
thus produce a thin tone.
Lyle: Let me know if you have any questions or
you would like extra help with your guitar studies. Email me at Lyle@theguitar.net for more info on how you
can get your own custom beginner lessons. I can even teach you your favorite
songs and you can download the lesson to your hard drive so you don't have to be
online to work on them. Thanks, Lyle.
|
<< load notation from left
|
|
<< load audio from left
|
<< load audio from left
|