Scroll through the lesson and click on notation/video/audio links to load the interactive players.
Please subscribe to get full access to all lessons for only $7.95/month PLUS 1 week free trial.

Riff Interactive lessons are
LESS expensive and
MORE interactive than alternatives!
More Info
|
|
Lesson
Ban 1
Teacher: Welcome class to the lesson on Essential
Guitar Techniques. This lesson will feature both fret and palm muting. This
is a very important technique to develop and incorporate into your playing.
Adding muting to your playing can give you sound more character and make it
sound more interesting. It is challenging to play at times, however these
exercises should help.
Teacher: Let's get started. Here's the first
basic technique example of "Fret
Muting."
Part 1 -
Basic Fret Hand Mute 1
Part 1 - Basic
Fret Hand Mute 1
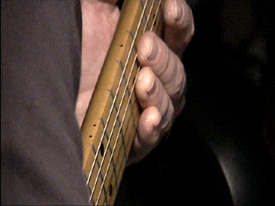
Teacher:
In this example you lay your 3rd finger slightly on the 7th fret. This adds the
muted sound as well as a slight harmonic if you might notice. Here's a picture
of the technique, remember note to press the strings all the way to the
fret.
Fret Hand
Mute
Teacher: Muting using the fret hand also creates
a harmonic as well, as I mentioned before. Muting can sound different, depending
on the fret position you lay you fingers.
dh: I noticed both the high and low E strings are not
muted is there a reason for that?
Teacher: DH, you can include the low E-string if
you want, I'll get into that later in the lesson. Here's the
next example.
Part 1 - Basic Fret Hand Mute 2
Part 1 - Basic
Fret Hand Mute 2
Teacher:
Notice the harmonic variations as I move up the fretboard, this correlates with
the harmonics on the 3rd, 5th, 7th, 9th and 12th frets. You can produce a
musical sound using only muted notes as you might have noticed. Try practicing
various combinations. Here's the next basic example and then we will get into
playing riffs.
Part 1 - Basic Fret Hand Mute 3
Part 1 - Basic
Fret Hand Mute 3
Teacher:
In this example I play single notes, notice the harmonic overtones as well.
Here's the next basic example.
Part 1 - Basic Fret Hand Mute 4
Part 1 - Basic
Fret Hand Mute 4
Teacher:
Same technique, but notice how playing the notes in the A Minor Pentatonic scale
sound different from actually fretting the notes. Notice the 5th frets sound
higher than the 7th fret notes. Here's the next example.
Part 1 -
Basic Fret Hand Mute 5
Part 1 - Basic
Fret Hand Mute 5
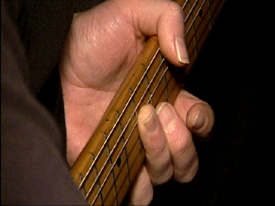
Teacher:
Now DH was asking earlier about muting the 6th string, in this case you barre
the 5th fret notes and mute the 5th fret/6th string with your thumb. Here's
a picture of this technique.
Fret Hand Mute - Thumb
Joel: Interesting.. I hear jazz, rock, funk, and other cool stuff
with this tech. :)
Teacher: Joel, yes! I'm
sure you'll notice all kinds of comparisons in many styles of music. You might
look at playing the guitar like a percussion instrument. Muting really allows
the syncopated notes to stand out. Another practice I do and suggest to all of
you is to practice like you are a drummer and try playing various rhythms, even
along with a drummer on a recording or to a drum machine. Use all muted notes
and focus only on developing you rhythm skills. This is something you can do
watching TV or listening to the stereo as well. Here's the next
example.
Part 1 -
Basic Fret Hand Mute 6
Part 1 - Basic
Fret Hand Mute 6
Teacher:
Now in this exercise you practice playing regular fretted notes, and then
lifting slightly to play muted notes. This is an excellent exercise. Here's the
next example.
Part
1 - Basic Fret Hand Mute 7
Part 1 - Basic
Fret Hand Mute 7
Teacher:
This exercise uses the A barre chord where you play the lower notes on the 5th
& 6th strings, and use the higher notes to mute and create a percussive
sound. OK, let's apply some of these examples to some riffs. Here's the first
riff.
Part 2 -
Hendrix Muted Riff 1
Part 2 - Hendrix
Muted Riff 1
Teacher:
In this example you simulate the sound of an automatic gun. You start by
barring the the D and mute by slightly lifting your fret fingers, and then shift
to play the lick in between the muted notes. Make sure you alternate
pick. Here's another Hendrix style riff you can try.
Part 2 -
Hendrix Muted Riff 2
Part 2 - Hendrix
Muted Riff 2
Teacher:
In this example you mute the barre 9th frets and play a rhythmic pattern. You
can also use a Wah or Envelop Filter pedal to get the unique phasing. See how
important the strumming hand is while you mute the notes. Here are a few funk
examples.
Part 2 -
Funk Riff 1
Part 2 - Funk
Riff 1
Teacher:
In this funk example notice how the muted portions of the phrase adds more
percussion. You should work on altering combinations of muted
chords. Here's the next funk
example.
Part 2 -
Funk Riff 2
Part 2 - Funk
Riff 2
Teacher:
Notice the muted notes on the 6th string using your thumb. Notice how the
syncopation is accented more with the added muted notes as well. Now we will
cover palm muting using your picking hand. Here's the first basic
technique.
Part 3
- Basic Palm Mute 1
Part 3 - Palm
Mute 1
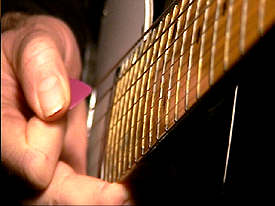
Teacher:
In this example you play the A Mixolydian scale, first regular, the next bar
palm muted. The palm muting makes the notes sound staccato. Here's an image of
you picking hand position.
Palm Mute
Teacher: For some of you it might take some
adjusting to get use to resting your palm on the strings. Try practicing you
scales using this technique. Here's another example.
Part 3 -
Basic Palm Mute 2
Part 3 - Palm
Mute 2
sammy_andrews: Is it ok to rest your palm just in front of the
bridge?
Teacher: Sure Sammy, experiment
using different positions to see what works best for you and see how the sound
can vary. I palm mute on the acoustic just over the bridge, that seems to
be the most comfortable position for me. Here's the next
example.
Part 3 -
Basic Palm Mute 3
Teacher:
In this example you play an ascending, and descending chromatic scale, once
using standard picking, the next using palm muting. Palm muting while playing
fast can sound awesome. Al DiMeola is a master at this technique. Here's an
exercise you can try using alternate picking and palm muting.
Part 3 - Basic
Palm Mute 4
Part 3 - Palm
Mute 4
Teacher:
This is a very cool combination to develop. Try practicing using chromatic
scales at first, and then playing diatonic scales like the A Minor, A Major,
etc. using this technique.
Teacher: Well, time to go. See you next
lesson!
sammy_andrews: ok...thanks, see ya next
week!
Teacher:
Bye!
|
<< load notation from left
|
|
<< load audio from left
|
<< load audio from left
|