Scroll through the lesson and click on notation/video/audio links to load the interactive players.
Please subscribe to get full access to all lessons for only $7.95/month PLUS 1 week free trial.

Riff Interactive lessons are
LESS expensive and
MORE interactive than alternatives!
More Info
|
|

Slide Guitar For Beginners
Open Tuning - Part
5
Lesson Sample
Teacher: This lesson uses the
open C tuning:
open C tuning
Teacher:
From standard tuning, re-tune the 6th string down two whole
steps to C,
5th string down a whole step to G,
4th string
down a whole step to C,
leave the 3rd string where it is
(G),
tune the 2nd string UP a half step to C,
leave the
1st string alone (E). You can use the tab file's embedded
audio playback to match up your strings by ear against
mine.
Roy: Lyle,
will the 6th string sound real low?
Teacher: Yes Roy, the 6th string
is lower in pitch by two whole steps, from E to
C.
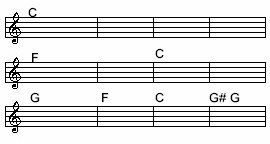
Teacher: Playing the blues with a slide is so
much fun in open tunings and you generaly only need 3 chords, the 1 - 4 - 5
chords of the key. In the key of C you need C, F, and G:
Chords in Open C
tuning
Teacher:
If you're tuned up correctly, your guitar should be in tune with mine. Play back
the chords in the tab file to check your tuning with me. All 6 strings can be
played straight across the neck with the slide to create the chords. Remember
that the slide goes on TOP of the fret wire, not between
them.
Teacher: Just for fun I wrote an intro to the
Lesson Sample. It didn't use the slide until the very last note of the
riff.
Teacher: You'll use your 2nd finger for this
little riff:
intro
riff
Teacher:
You can loop the tab if you want. Later this riff will be used in a
solo!
Teacher: That's just a simple fun riff to play in
the open C tuning. Here's how the whole intro is played using your 2nd finger,
then the slide for the very last note:
intro
intro
Teacher: Out of the 3 basic chords in the key of
C, using the open C tuning, we can play many riffs at each chord location on the
neck. The chord progression for this 12 bar blues jam in C goes like
this:
chord
chart
Teacher: Before I show you the first solo I'll
show you the main riff that makes up the theme of the
solo:
main
riff
main riff
Teacher: You can loop the tab file to practice
the main riff with me.
Teacher: At the end of the solo is the turnaround
riff. You'll use your 2nd and 1st fingers of your left hand in the first measure
of the turnaround:
turnaround riff
turnaround
riff
Teacher: Any questions so
far?
Rob: I use
my slide on my fourth finger. Can I use first, second and third in the
turnaround riff?
Teacher: Sure Rob.
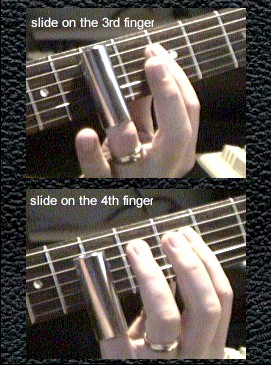
Mathew: Is
there a rule of thumb as to where a slide should go?
Teacher: Most of the time the 3rd or 4th finger
is used for wearing the slide.
slides on fingers
Teacher: Now that you have learned the
main riff and the last riff called the turnaround, here's the first complete
solo:
solo
1
solo
1
Teacher:
Notice when the chords change to F and G the solo riffs move to those chord
positions on the neck. This makes it easy and fun to play blues in open
tunings.
Teacher: Here's a jam track you can use to play
along with:
Looping Jam Track - solo 1
Teacher: The second solo has many riffs and
brakes away from the main riff/theme of solo 1, but still following the chords
for the riff locations:
solo 2
Teacher:
Here's a jam track for solo 2, it's the same progression but in the back ground
is solo 2:
Looping
Jam Track - solo 2
Teacher: Remember the intro riff at the beginning
of the lesson? Here's a way you can play it into the 12 bar jam during the C
chords:
solo
3
Looping Jam Track
in C
Teacher: That should give you all a bunch of cool
riffs to work on!
Teacher: That's all for this lesson. Thank you
very much for purchasing this product, I had a lot of fun making it! -
Lyle
Lyle@theguitar.net

|
<< load notation from left
|
|
<< load audio from left
|
<< load audio from left
|