Scroll through the lesson and click on notation/video/audio links to load the interactive players.
| Lyle Ronglien >> Strumming & Picking Patterns >> |
|
|
Please subscribe to get full access to all lessons for only $7.95/month PLUS 1 week free trial.

Riff Interactive lessons are
LESS expensive and
MORE interactive than alternatives!
More Info
|
|

Picking Patterns - part 2
Lyle: Here's a sample of the what you'll be
learning in this lesson:
Lyle:
You'll work with right hand finger picking in the following examples.
Here's your jam track:
Lyle: We'll be working in E minor for now.
Let's use this chord to start with.
Lyle: Right hand finger markings are: The "p" is your thumb,
"i" is index finger,
"m" is middle finger,
and "a" is your ring finger.
Lyle:
This is an open E minor chord,
using just the 6th, 3rd, 2nd and 1st strings.
Line up your right hand fingers on those strings and follow the tab.
right hand fingers
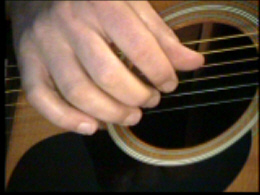
Lyle: Just like the picture, only your thumb will be on the 6th string.
Here's a video clip:
Lyle:
Here's a single string E minor scale on the 1st string. This will be part of your first lick which is coming up.
Lyle:
Lick 1 is using the open strings of the E min chord and also the E min scale ascending the 1st string.
Keep you right hand steady, your ring finger will be plucking the 1st string always.
Now learn the same scale on the 4th string or "D" string:
Lyle:
This will still be E minor.
Now you'll move your right hand thumb over to the 4th string and play lick 2:
Lyle: Try playing these licks along with
the looping jam track. Sounds a little like a "Pink Floyd" lick.
Lyle: Now you'll add the 3rd string to that
last lick.
Look at these "shapes" and memorize them...
Ron:
Any trick to getting a clean sound. Mine seems some what dulled?
Lyle:
Ron, are you using an acoustic?
Ron: Yes.
Lyle: Might be time for a new set of
strings. Old strings sound dull.
Lyle:
Lick 3 uses these shapes from the 4th and 3rd strings...
Lyle:
Lick 3 is a little harder than these other licks. Soon your ear will help you recognize the bad notes.
Lyle:
Let's switch to E Maj now, here's a new jam track:
Lyle:
Here's the E major scale on the D or 4th string
Lyle:
Notice the difference between the E minor scale and the E maj scale,
3 notes are different,
the 3rd, 6th and 7th notes of the E minor scale are lowered by one fret, or "flatted".
Now learn the two string shapes again, but for E major.
Lyle:
Lick 4 uses these shapes and the open 1st and 2nd strings
Lyle:
All these "licks" are good warm ups for your right hand fingers.
Lyle: Now let's change the picking pattern around,
start with your thumb, then ring finger, 1st finger, then 2nd finger:
Lyle: Here's a video clip of this new
patter:
Lyle:
Lick 5 uses the new picking pattern along with the first two "shapes" of lick 4:
Lyle: Here's a video of lick 5:
Lyle: Remember to try these licks along to
the jam tracks. Playing along to a beat will help you keep your timing.
Loki: Are you going to tab out the whole intro lick to practice?
Lyle:
Loki, the whole intro lick is made up of all these licks here tonight! The only thing different in the intro licks is that I played each lick ascending and descending.
I think they are in order for the licks in E minor.
Lyle:
Now try learning these "shapes":
Lyle: They are E, A, and B chord shapes with droning open 1st and 2nd strings.
Lyle: Now try this:
Lyle: These are great right hand ex. that will help get your fingers in sync.
Try to memorize these licks as best you can and use them for warm-ups.
Lyle:
That’s all for this lesson.
If you would like further study on this topic or any other topic, email me at
Lyle@theguitar.net for info on how you can get your own customized guitar
lessons like this using Riff Interactive technology. Your private lessons can be
downloaded to your pc for anytime, anywhere study. Thanks and see you at the
next lesson. - Lyle
|
<< load notation from left
|
|
<< load audio from left
|
<< load audio from left
|