
Beginning Guitar II -
Lesson 1
Learning The Fretboard
Lyle: In this lesson you will learn how
to find and name any and all the notes on the fretboard. First you need to
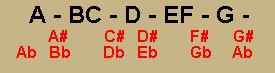
understand that the musical alphabet is simply: A-B-C-D-E-F-G, then it repeats.
That is a total of seven tones. There are 5 other tones that are referred to as
the sharp (#) and flat (b) notes.
all the notes
Lyle: All the natural
notes are two frets apart, but the B &
C and E & F are next to each
other.
Lyle: So, take those 7 tones, A through G, plus
the 5 sharp and flat tones and you have a total of 12 different
tones in music to work with. That's it! Think of all the music you've
heard in your life, it has all been made using any of the 12 tones. It's all how
the musical puzzle is put together, which is how you get the chords and scales
used to make melodies and songs. You'll learn all that kind of stuff in later
lessons, but for now you'll focus on the name of just the
notes.
Doug: So
naturals are non-flat, non-sharp notes in the C scale?
Lyle: That is correct Doug. Playback this TAB
file and you'll see all twelve tones on the 5th string going from A to
A:
12 tone
scale
Smitty: Are
the circled notes the flats?
Lyle: Smitty, when you
playback the TAB file for the 12 tone scale, you'll see the name of the notes on
the fret board. The circled notes are the sharp/flat notes.
Lyle: For now, I feel it's best to learn
where all the natural notes are, the A through G notes, all over the neck. Once
you have memorized them, the sharp and flat notes will be easy to find. Here
is where they are on the 1st
string:
A B C D E
F G on 1st string
Lyle: A# is the same as Bb, just called different
depending on what key you're in. Notice that the B and C and E and F are next to
each other, and all the other notes are two frets apart.
Lyle: Here's these notes on the 2nd
string:
A B C D E
F G on 2nd string
Lyle:
Here's A through G on the G/3rd string:
A B C D E F G on 3rd string
Lyle:
Be sure to play the TAB files back so you can view them on the virtual
fretboard. It will help you visualize the note locations and
names.
Lyle: Here's A through G on the D/4th
string:
A B C D E
F G on 4th string
Lyle:
Now look at the 5th string, the A
string:
A B C D E
F G on 5th string
Lyle:
The E/6th string is the same as the E/1st string. All the note names will be in
the same "place" or fret location:
A B C D E F G on 6th string
Lyle:
When you playback the next TAB file, it will be a good reference for you to
"see" all the natural notes laid out over the neck:
All the
Natural Notes
Lyle:
Here's a simple exercise for you, find and play ALL the A notes on your guitar
neck:
all the A
notes
dh:
Interesting how the 5th,10th,12th fret have all natural notes on each string of
that fret!
Lyle: Yes, and the zero fret, the open
strings!
Lyle: After you have mastered finding and playing
ALL the A notes on your guitar, or the ones you can reach, try this with ALL the
B notes, ALL the C notes, etc....:
all the B notes
all the C
notes
all the D
notes
all the E
notes
all the F
notes
all the G
notes
Lyle:
Simple, yet challenging stuff, finding and playing just selected notes all over
the neck. Make it a game or a "solo" for yourself.
Lyle: Just remember, All the natural notes are
two frets apart, but the B & C and E & F are next to each
other.
Lyle: The next part of this lesson can be a
little advanced for the total beginner, but it is a very important part of your
journey if you are dreaming of becoming a virtuoso on the guitar. It is also
tied in with these natural notes we have been dealing
with.
Lyle: You don't have to learn all of the next
part of this lesson, but you can always come back to it at a later time when you
feel you're ready. Here we go:
The Five Distinct Fingering
Patterns
Lyle: The “five
distinct fingering patterns” when laid end-to-end cover the entire fingerboard
from the lowest to the highest points in any key. A full command of scales and
variety of intervals is a prerequisite to the command of each of the “five
distinct fingering patterns”. You should reach a point of visually seeing what
you hear and be able to relate to one or more of the five basic fingering
patterns.
Lyle: When all of the five basic fingering
patterns are telescoped into one position, you can play with ease in five
different keys. In other words, two octaves and a third of chromatic tones are
playable in one of the basic fingering patterns without moving the hand. A
finger per fret is the general rule. The first finger is available to stretch
down a fret and the little finger is available to stretch up a fret. Harmony
does result from scales, and so do chord fingerings result from the “five
distinct fingering patterns”. The “five distinct fingering patterns” can be
visually related to the five basic chord forms; A, C, D, E, G, which are derived
from the open string six-note chords fingered in the first position. You'll
learn all about these soon.
Lyle: Here's your first pattern, it uses all the
natural notes. When you playback the TAB file, the correct fingering will be
displayed on the virtual neck:
Fingering I
Fingering
I
Lyle:
Just for fun, learn that fingering pattern and then play it along to this
looping jam track. Each natural note will fit and sound good with the jam
track:
Jam Track
in C major
Lyle:
Now I'll post the remaining 4 fingering patterns for all the natural
notes.
Fingering
II
Fingering
II
Fingering
III
Fingering
III
Fingering
IV
Fingering
IV
Fingering
V
Fingering
V
Lyle:
Two basic rules for connecting the “five distinct fingering patterns”;
1.Slide the fingers on the half steps.
2.Stretch with the little finger
in ascending lines.
Lyle: Here's a
look at connecting them:
Sliding on the half steps - ascending
sliding on the
half steps - ascending
Sliding on the
half steps - descending
sliding on the
half steps - descending
Lyle:
Remember, these might be a bit much for some of you to be working on right now,
but maybe in the near future you'll work on these fingering positions. When you
do practice these fingering patterns, use alternate picking starting
with a down stroke. Just keep alternating going down, up, down, up...etc..
Here's a close up of this technique:
picking hand close-up
Lyle: Here's a video clip of me "improvising"
some of these fingering patterns against the looping jam track. Any of the
natural notes will sound good against the jam track:
example 1 -
improvising with the notes
Lyle:
The first half of the lesson is easy and good for you to know, the second half
is real good reference stuff that some of you may want to skip for the time
being and come back to it later when you're real curious!
:-)
Lyle:
Memorize the name of the natural notes on the neck! see you at the next
lesson!