Scroll through the lesson and click on notation/video/audio links to load the interactive players.
Please subscribe to get full access to all lessons for only $7.95/month PLUS 1 week free trial.

Riff Interactive lessons are
LESS expensive and
MORE interactive than alternatives!
More Info
|
|

Beginning Guitar II
- Lesson 5
More Open Chord Study
Lyle: Welcome! Let's start by checking
your tuning with me:
check your tuning
Lyle:
During the last couple of lessons you learned 5 major chords, followed by 3
minor chords, all played in the "open position". In
this lesson you'll get extra practice playing all of the chords in several
different chord progressions.
Lyle: One of the hardest things the beginning
guitarist faces is the problem of switching between chords. It takes a little
extra practice, which is why we are
here!
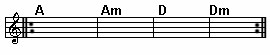
Lyle: Let's review the chords. Check out the A
and Am chords:
A
and Am
A and
Am
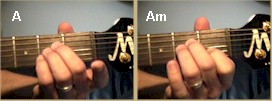
Lyle: Sometimes the beginner plays the A chord
using the 1st, 2nd, and 3rd fingers. I find it tough to squeeze those three
fingers in so I use my 2nd, 3rd, and 4th fingers to make the open A chord. This
way
also makes it quick and easy to switch to
Am!
Lyle:
Try this rhythm pattern to practice these two chords with. You should select the
LOOP button on the TAB file so you can play right along with
me:
exercise 1 - A
to Am
A to Am
Lyle:
Notice that I'm counting out loud with the rhythm pattern. This is a very
important technique you should practice doing. Try tapping your foot and
counting to 4 while you play the rhythm pattern. Here's a video
example:
tap your
foot and count
Lyle:
Can you do it? Tap your foot, count out loud and strum, that's harder than
chewing gum and walking for sure!
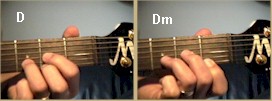
Lyle: Let's review the D and Dm
chords:
D and
Dm
Lyle:
These two chords are not as easy to switch back and forth like the A to Am.
You'll have to adjust your fingerings.
D and Dm
Lyle: Now practice switching between these two
chords with this rhythm pattern. Keep tapping your foot and counting out loud
while practicing this:
exercise 2 - D to Dm
D to Dm
Lyle:
Remember to select the LOOP button in the TAB playback window so you can
practice playing along with me.
Lyle: Next is the E and Em chords. These two are
easy to switch between:
E and Em
E and
Em
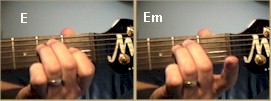
Lyle: These two chords are the biggest and
deepest sounding of all the chords you can play on the guitar. Now practice the
rhythm pattern between the two chords. Make sure each note rings clearly so you
can hear the difference between the two.
exercise 3 - E to Em
E to Em
Lyle:
The last two chords to review are the G and C chords:
G and
C
G and
C
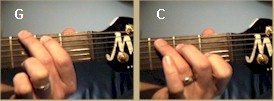
idiot812: I find that to be one of the hardest switches
to make, well, pretty much anything into the C.
Lyle:
These two are harder to switch between because your fingers have to move all
over the place. Try this rhythm pattern exercise:
exercise
4 - G to C
G to C
jeff: Is it ok
to use the 2,3,4 fingers for g instead of 1,2,3 fingers? I find it easier to
go to C from there.
Lyle: Yes, here's a TAB file displaying this
alternate fingering for the G chord:
Alternate fingering for the G chord
Lyle: This way your third and second fingers stay
in the same "shape/position" and only have to shift over a
string.
Alternate
fingering for the G chord 2
Lyle: Now that you have reviewed the 8 chords,
it's time you try playing them in what's called a "chord progression". Here's
the first progression to work on:
progression 1
progression 1
michelle:
Lyle, what can we do other than practice to switch chords
faster?
progression 1
Lyle: Go
slow and see if you can switch chords without looking at your fingers, imagine
yourself playing. Just move them into position. If they don't land in the exact
spot, just wiggle them a little into
place.
michelle:
Thanks I'll try that.
Lyle: These exercises will help you. If you can
play them right along with me you're doing great! It may take a little time,
just keep playing, just keep playing.
Lyle: Select the LOOP button in the TAB player
window to jam along with me on these progressions.
Lyle: After you have mastered progression 1,
you'll add E and Em to the end to make this new exercise:
progression 2

progression 2
progression
2
Chris: Just
taking your suggestion on not looking at the fingers on the left hand is making
it easier already. I was over thinking everything
Lyle: !!! Great!!!
idiot812: Yeah, that surprisingly does help......I take
it my fingers can memorize better than
me?
Chris: Missing every
other chord but who cares. I feel like I am moving
forward
michelle: It sure does work.
Lyle: It's a thing called "muscle memory". Just
visualize them much like a basketball player visualizes throwing free throws.
You train your brain to do all the work for you. You create a form of
automation.
Lyle: Now try this progression
that uses all the chords:
progression 3
progression 3
progression 3
Lyle:
Remember, you can LOOP any of the TAB files to play along with me for these
exercises. Count out loud and learn to tap your foot too, all at the same
time.
Lyle: Here's a looping jam track for Progression
3 that doesn't have my voice in it counting along. See if you can keep up with
it:
Progression 3
Jam Track
Lyle:
Your goal for this lesson is to be able to play progression 3 several times
through without stopping, and hopefully tapping your foot and counting along the
way.
Lyle: That's all for this lesson and series. Time
to move on to the next series of lessons which will teach you even more! There
is always more music to learn, which is one of the great things about learning
to play an instrument, there's a never ending journey of things to learn!
If you have any questions about these lessons or you might like to have a custom
lesson made just for you to download, email me at
Lyle@theguitar.net . Thanks and happy
pickin'!
|
<< load notation from left
|
|
<< load audio from left
|
<< load audio from left
|