| Lesson Subject:
Rolling Stones Style |
| What you learn:
Rhythm &
Solos (C) |
| Michael: Michael Johnson |
Michael: This interactive lesson will cover lead style
of the Rolling Stones, ala Ron Wood! Ron has a very unique country-rock lead
style which was influenced by some of the old country greats and rock
'n' roll
players like Chuck Berry. Ron's solos always fit nicely over Keith Richard's
melodic rhythm style, much in the way a great classical composer would
intertwine horns, percussion and strings to layer the sound of the band. Sample some of the licks you'll
learn:
Lesson Sample
Michael: In
this lesson we'll learn a few techniques that show you how to achieve that
sound. Here's a summary:
1. Plying the C
I, IV, V progression
2. Playing Major Pentatonic scales that follow each
chord of the progression
3. Playing licks in the scales that follow the
progression changes
Michael: This is fun stuff! I have a
great time playing them!!! Here's the notes and related chord for the C I, IV V.
The tab will show you the various positions you can play a C - I, IV, V
progression, the notes are highlighted in the tab:
Michael: This is
based on the C major scale: C, D, E, F, G, A,
B.
What notes make up the I, IV,
V?
arpeg: C F
G
Michael: Correct arpeg!
C (I), D (II), E (III),
F (IV),
G (V), A (VI), B
(VII)
Michael:
In this case we'll use the barre chords
rooted on the 6th string (E). Here's the C major barre chord and the attached C
Major Pentatonic scale pattern:
Michael: Notice the
pattern is the same as a A Minor Pentatonic scale. In this case the C Major Pentatonic
is RELATIVE to the A Minor Pentatonic. Notice you start on the C note as the
root instead. I highlighted the ROOT notes
"C", so you can play the barre chord, move a step and 1/2 down, play the
pattern and it gives a country rock/rock sound. Now you can follow the
scales with the chords. Here's the F barre chord and F Major
Pentatonic.
Michael:
See how it changes positions, but same pattern. Make sure you practice these
scales, you'll need it in a little bit. Now, here's the G Maj barre and G Major
Pentatonic which is the V of the
progression.
Michael: Same chord
and scale pattern for each neck position. Now here's the progression we're
going to play the coming licks over.
Michael:
Here's a break down of the chord and scale order. In this progression we have a
I, IV, I, V, I progression, or other words C, F, C, G, C. To make it fun try
practicing over this jam track:
Looping Jam Track 1
Michael:
Try practicing the scales and changes over the jam track a few times, then I'll
give you the licks. The whole idea is to get use to changing the scales, this
applies to the coming licks as well. Here's the rhythm tab if anybody wants
to learn it:
rhinosaur:
Easy
to understand.
Michael:
Good, it's basic stuff. The main idea is
the changes standard rock n roll pattern. Now let's get down with the
licks! Here's a cool country rock sounding lick:
Lick 1 sample
Michael:
Here's a jam track you can practice the
licks over.
Looping
Jam Track - Lick 1
Teacher: Notice how it
follows the progression, same lick, different positions. Notice
you position your hand using the 4th barred on the 8th fret. The highlighted
notes are the root notes.
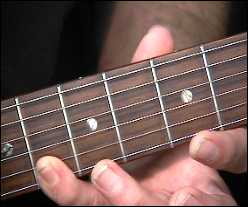
Michael:
Notice the 2nd finger supports the 3rd when bending the 3rd string. The jam
track will give you an idea on the
phrasing.
Razz:
I
like that, there's a bit of a burn in the ring finger =)
Michael:
Oh yes Razz, some of you can also jam on
the C major pentatonic scale all the way through the progression as an
option. Here's our next lick
variation:
Lick 2 sample
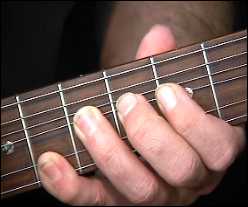
Michael:
This lick is a lot like the last one but playing 3 notes at a time for the
beginning of the phrase. Here's a jam track you can play
over.
Looping Jam
Track - Lick 2
Michael:
The last lick sounds very country, it shows the country influence of the
Stones.
finn: My
pinkie wants to lift off :(
Michael:
Adjust your thumb to pinch the back of
the neck.
finn: Much
better!
Michael:
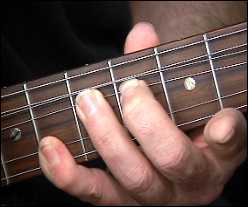
The thumb gives you the extra strength. OK next lick... this lick takes the same positions but plays a variation on the
scales:
Lick 3 sample
Michael:
Notice the bend on the 3rd string then the 4th finger is in position to play the
next note, and then the 1st finger on the high E string. This position can be a bit of a
challenge for some, try playing to this jam track:
Looping Jam
Track - Lick 3

Razz:
Great strengthening
exercise by it self even!
Michael:
You bet Razz!
Tonester:
Are you "clawing" with your picking hand?
Michael: You can Tonester, but I'm
using a pick for this example, but the clawing will really make it sound country 8-)
Also try holding the 3rd string up with out bending to neutral position while playing the other strings as well, it sounds
cool!
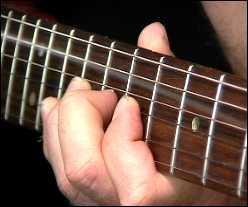
arpeg: What does clawing mean?
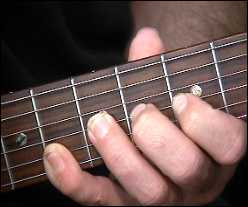
Michael:
Using you fingertips to
pick by hooking them under the strings. Here's a picture of this technique.

Michael:
You can use your fingernails as well to
get more attack, much in the way a classical player does. Here's our next lick,
this is a variation on the last one:
Lick 4
sample
Michael:
Same hand positioning. Here's a jam track:
Looping Jam
Track - Lick 4
Michael: Here's the
last lick, it's a another variation on the last theme:
Lick 5
sample
Looping Jam Track
- Lick 5
Michael:
Now try to mix these licks up like I demonstrated in the first audio
sample:
Lesson
Sample
Michael:
Well class it was great having you all, see you next lesson!
Razz: New riffs are almost as cool as new strings
=0
|
<< load notation from left
|