Lesson Topic

Backing Tracks

Teacher:
Hello and welcome to Developing Speed Techniques. In this series we will look
at exercises and phrases to develop controlled speed
technique.
Teacher: Some might ask, why Speed? We might all
agree that fast playing does not necessarily equate to good playing. Still,
there is an emotion to speed that is nice to have under your belt. Also,
learning speed technique correctly means having confidence and control when
playing at slow tempos.
Teacher: For what I think we want
to achieve I present the Five C's of Speed.
- Context of Speed - We are looking to achieve speed runs in the
context of our normal (slower) playing.
- Control of Speed - We want to have control over these phrases,
not out of control.
- Clean Speed - Speed runs will be perceived as much faster with clean
execution and timing.
- Concept of Speed - Th
- Consistency of Speed - The development of controlled speed takes
practice. Still, those
following the exercises given in this series should feel and see improvement
in their speed technique in less than a dozen practice sessions.
Teacher: Al DiMeola, Steve Vai, Joe Satriani, Yngwie Malmsteen, John
Petrucci, Eddie Van Halen, John McLaughlin are some guitarists noted for their
technique.
Teacher: All
dedicated themselves to consistent practice for years.
Teacher: Let's get started
with Right Hand Position.
Right Hand Position
Teacher: When
looking at the playing of 'fast' guitarists, there are many different right hand
picking positions. Each has a hand and pick position that works for
them.
Teacher: Finally, it almost required to
have a metronome to get the most out of these exercises. I loaded some looping
jam tracks at the beginning of the lesson to get us
rolling.
Teacher: A metronome will give you more
incremental progress which is what we are after.
Teacher: Lets get started with Right Hand
Position.
Picking Grip
Teacher: An effective way to find the best one
for you is to work on developing your 'tremolo'.
Teacher: Tremolo picking is rapidly alternate
picking on one string.
Teacher: Rather than trying to speed up
slow, but accurate, picking take your tremolo technique and then slow it down
and control it.
Teacher: The long term goal is to develop one
picking position that can be controlled to cover all speeds and picking
patterns. This is the best way to integrate speed playing in to your
style.
Teacher: Find a right hand position that is
comfortable and relaxed. If you find that your body, arm or hand is tensed up,
your teeth are clenched, you forget to breathe, etc... you haven't found your
fastest possible right hand position. Besides not being particularly
healthy!
Teacher: Experiment with tremolos on different
strings. Loud and soft tremolos, muted strings and open. And combinations of all
the above.
Teacher: You might also try looking in the mirror
when performing these tremolos. It is sometimes easy to spot tension using this
as feedback.
Teacher: I prefer a heavy pick. More immediate
feedback from the string and less delay in sounding the note. The right answer
is what you prefer. I tell my students to start with a heavy
pick.
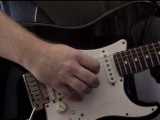
Teacher: Right hand positions possible include
anchored, usually using the side of the palm on the bridge or on unused
strings.
Teacher: Also using the little finger to
touch the pickguard is a common anchor. But some speed players, including Eddie
Van Halen and many jazzers don't touch the right hand to the guitar when fast
picking
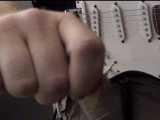
Teacher: Work for a light touch in both hands.
Gripping the pick more firmly wiil then be useful to bring out
accents.
Teacher: There are many variations of pick angle
as well. Experiment. I hit the string fairly perpendicular, but many angle
slighty 'forward'.
Teacher: Try to get the least amount of
movement. I think it should be isolated to the thumb, fingers and wrist as much
as possible. Some forearm, no elbow.
Teacher: Let's work on some exercises to build
speed.
Downstrokes -
Quarter Notes
Teacher: This first tab is of a picking pattern
to get us grounded. Keeping a steady beat play one note on each beat using all
downstrokes. Probably start around 140-150 BPM. BPM= Beats per
Minute.
Four Note
Speed Burst
Teacher:
Now change two consecutive downstrokes into a down-up-down-up-down pattern.
Starting and ending exactly on consecutive metronome clicks. Once this burst is
even then speed up the metronome.
Teacher: In the tabs, D=Downstroke, U=Upstroke.
Teacher: The example emphasizes playing
four notes per beat, an even two or four feel. You should supplement it with
learning to play six notes per beat to develop the 'triplet
feel'.
Six Note
Speed Burst (Triplet Feel)
Teacher:
If this is difficult, slow down the tempo at which you are practicing the
phrase. For some, the drum tracks end at 160 BPM and this may not challenge
enough. Then get out your metronome/drum machine. Everyone has a metronome,
right? Be honest. If not, get a battery powered digital one. They are small
enough to fit in any case or music stand and are very durable. Drum loops of
different tempos at the beginning of the lesson.
Teacher: The concept of speed is think
in flowing groups of notes rather than ivdividual strokes played
fast.
Concept of
Speed - Notes in Groups
Teacher: You can speed up and control groups much
more easily. Even when the notes are in an even stream you group them. This
helps most when you utilize the next group as a 'goal' note to be reached
exactly on time/beat.
Teacher: Let's get our left and right hands
coordinated.
Quasi-Chromatic exercise
Teacher:
Simple exercises that don't involve a lot of mental energy are often the best
way to fine tune your basic
coordination.
Teacher: Almost any fingering pattern which is
easy to visualize will work fine. The example is a classic exercise for left and
right hand coordination.
Teacher: Remember you will be playing
these exercises slowly at first, but use your tremolo speed style of right hand
picking!
Teacher: A great variation is to play the same
fingering pattern evenly while accenting the first of every three
notes.
Quasi-Chromatic in 'three' accents
Teacher:
Accents are a great way to stay on the beat and avoid 'floating' in time. If you
can't accent where you choose, slow down until you can.
Teacher: Switch the order of the notes on the
starting string and repeat that new pattern from string to
string.
Quasi-Chromatic - new order
Teacher:
Accent in fours.
Teacher: There are 24 possible combinations if
you really want to put in some practice time. 1-2-3-4, 2-3-4-1, 4-2-3-1,
etc..
Teacher: A cool variation is this
riff/warmup.
Mixed
Finger Exercise
Teacher:
This is actually a riff I learned from Lyle Ronglien, who runs theGuitar.net.
Another Riff site with cool archives and lessons. A Great exercise that combines
four different fingering combinations both ascending and
descending.
Quasi-Chromatic string change
Teacher:
Include a string change. Now each repeat will also have a string change. Try
accenting in fours and
threes.
Quasi-Chromatic Three Note Per String
Teacher:
It is extremely important to develop techniques based on fingering patterns that
use three notes per string. Three note per string patterns are very usefully as
we will see later. You can still accent these in groups of
four.
Teacher: Let's try building some speed with this
idea.
Speed Builder
Lick 1
Teacher:
Understand that most speed runs utilize a pattern of left and right hand
movement which will repeat in identical or similar fashion string after
string.
Teacher: The first important concept is to
identify and master this 'increment' from the beginning and up to, and
including, the first note of where it starts to repeat. Don't worry about
speeding up the rest of the run until you can blaze on this first
section.
Increment +
Tremolo Alternation
Teacher:
A few notes of the increment alternating with tremolo.
Four Note Alternation
Six Note
Increment
Teacher: Four notes then six note increments,
which ends with the first note of the
repeat.
Teacher: Now try to master the next increment.
Then connect the two increments together. Tackle each section until you can
easily play it individually before adding it on to the
run.
Six Note
Increment Part 2
Increment
Connection
Teacher:
Finally you put them together.
Teacher:
Well time is up. I will send one more riff, more 'down' in sound. Work with
these and make up your own.
Teacher: Next time we will look at the next piece
of the puzzle, applying this coordination to scale
positions.
Descending Speed Lick