Scroll through the lesson and click on notation/video/audio links to load the interactive players.
Please subscribe to get full access to all lessons for only $7.95/month PLUS 1 week free trial.

Riff Interactive lessons are
LESS expensive and
MORE interactive than alternatives!
More Info
|
|

Beginning Guitar
IV - Lesson 1
Bar Chords - E Position
Lyle: Welcome! Here is the start of a
new series of lessons, all about the basic bar chords. These can be very hard to
play for many beginners, but I thought I'd go ahead and expose you to them now
rather than wait. Think of this as your own library of chords. You'll be able to
come back to these lessons any time you might need to find a new way to play a
chord. The bar chords are made from the simple open position chords you learned
earlier, they are just moved up the neck. Follow me, I'll show
you!
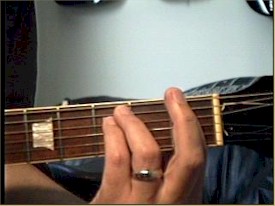
Lyle: A bar chord means you'll be using a finger
to press down on two or more strings at a time. Knowing how to play bar chords
helps you find and play virtually any chord, anywhere on the neck. The first
thing you need to do is get your wrist into the right position to make a good
bar or clamp between the index and
thumb:
wrist
position
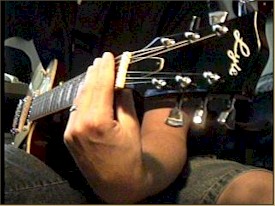
Lyle: Notice the hook shape of my arm and wrist.
Here's a video clip of this:
wrist position
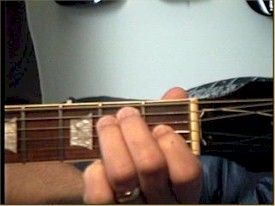
Lyle:
Try this exercise. You'll bar the first fret with your index finger over the
first two strings:
bar exercise 1
Lyle:
Can you get both strings to ring clearly at the same time while pushing down on
the 1st fret?
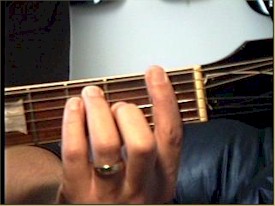
Lyle: Now try three strings like
this:
bar exercise
2
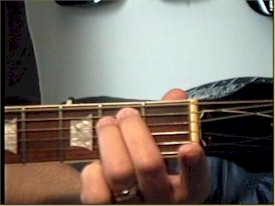
Lyle:
Now try all 6 strings like this:
bar exercise 3
Lyle:
If you're using an acoustic guitar, barring across all 6 strings is tough to do
and takes a lot of hand strength.
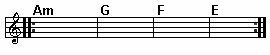
Lyle: In the last few lessons you learned about
open position chords such as A, C, D, E, and G. Take a look at these chords that
are all in the "E position" :
open position E chords
Lyle:
All of these E chords have something in common, they all use the big E / 6th
string as the root or bass note, and they all have a shape to them that is
similar.
Lyle: Let's take the basic E
chord and move it up 1 fret and add a first finger bar to make an F
chord.
E to
F
E to F
Lyle:
Se how the shape of the E chord is the same as the shape of the F
chord.
E
F
Lyle: Only your fingers have to change position
to go from the E to F. Same thing with the Em to Fm, you just move the "shape"
of the chord up a fret:
Em to Fm
Em to Fm
Lyle:
Roll your wrist down and away from you when making a bar so that your thumb is
under your index finger.
Em
Fm
Lyle: When moving back and forth from E to F, or
Em to Fm, you can keep the same fingerings for each chord, just slide the hand
up and down a fret.
Lyle: Here's the basic few chords from the open E
position, all moved up to the first fret to make F
chords:
F chords
using the E position shapes
Lyle:
The last chord, FM7 or Fmaj7, doesn't use any barring, but you mute the 5th and
1st strings. Notice the shape of the open position E
chords and the barred F chords are the
same.
Lyle: We "transposed" the E chords up 1 fret to
get to the F chords. Next I'd like to show you how each of the basic chords,
(maj, min, min7, dominant 7 , and maj7) can be played all the way up the neck
using these movable shapes. Here's all the plain major chords up the neck. The
6th string is the root note.
major chords in the E position
Lyle:
Here's all the minor chords using the Em shape and moving it up the neck to get
any minor chord:
minor chords in the E position
Lyle:
Here's all the minor 7 chords:
minor 7 chords in the E position
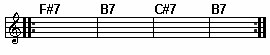
Lyle:
Here's the dominant 7 chords, the bluesy sounding chords:
dominant 7
chords in the E position
Lyle:
Last but not least, the major 7 chords:
major 7 chords in the E position
Lyle:
So what are you supposed to do with all those chords I just gave you? Just
understand them and where they came from. Memorize the shape, the name, and the
root note along the 6th string. You can come back to this lesson later for
your own review. Think of it as your own little chord
library.
Lyle: Here's a short chord progression for you to
practice.
progression
1
progression 1
progression
1
Lyle:
Here's a looping jam track for you to practice playing this progression
with:
Jam Track -
progression 1
Lyle:
Here's another progression using just the dominant 7
chords:
progression
2
progression 2
progression
2
Lyle:
Notice the dominant 7 chords have that blues sound to them. Here's a looping jam
track for this progression:
Jam Track - progression 2
Lyle:
That's all for this lesson, next lesson is all about the movable A position bar
chords.
|
<< load notation from left
|
|
<< load audio from left
|
<< load audio from left
|